


In the world of technology, the surge in mobile app development has positioned React Native at the forefront, revolutionizing how developers create versatile and efficient applications. This React Native development environment has become essential for anyone looking to build high-quality native applications swiftly. With its capacity to share code across platforms, React Native simplifies the development process, saving time and resources.
Aloa, an expert in software outsourcing, understands the complexities of setting up a React Native development environment. We ensure the seamless creation of new React Native projects by leveraging comprehensive tools. Our commitment and guidance extend to employing environment variables, managing system settings, navigating the integrated development environment, and effectively initiating new projects.
Employing our best practices and insights, we've compiled this guide to explore the intricate steps in setting up a react native development environment. Here, we will cover the requirements for React Native development and explore its benefits. Afterward, you'll learn how to set up a development server, manage package managers, and utilize features for code completion and syntax highlighting, ensuring a streamlined mobile app development process.
Let's dive in!
Requirements Needed for React Native Development
Setting up a React Native development environment requires an understanding of hardware and software requirements. Here, we outline the essentials to get you started with React Native development, ensuring you have the tools and knowledge to create applications efficiently.
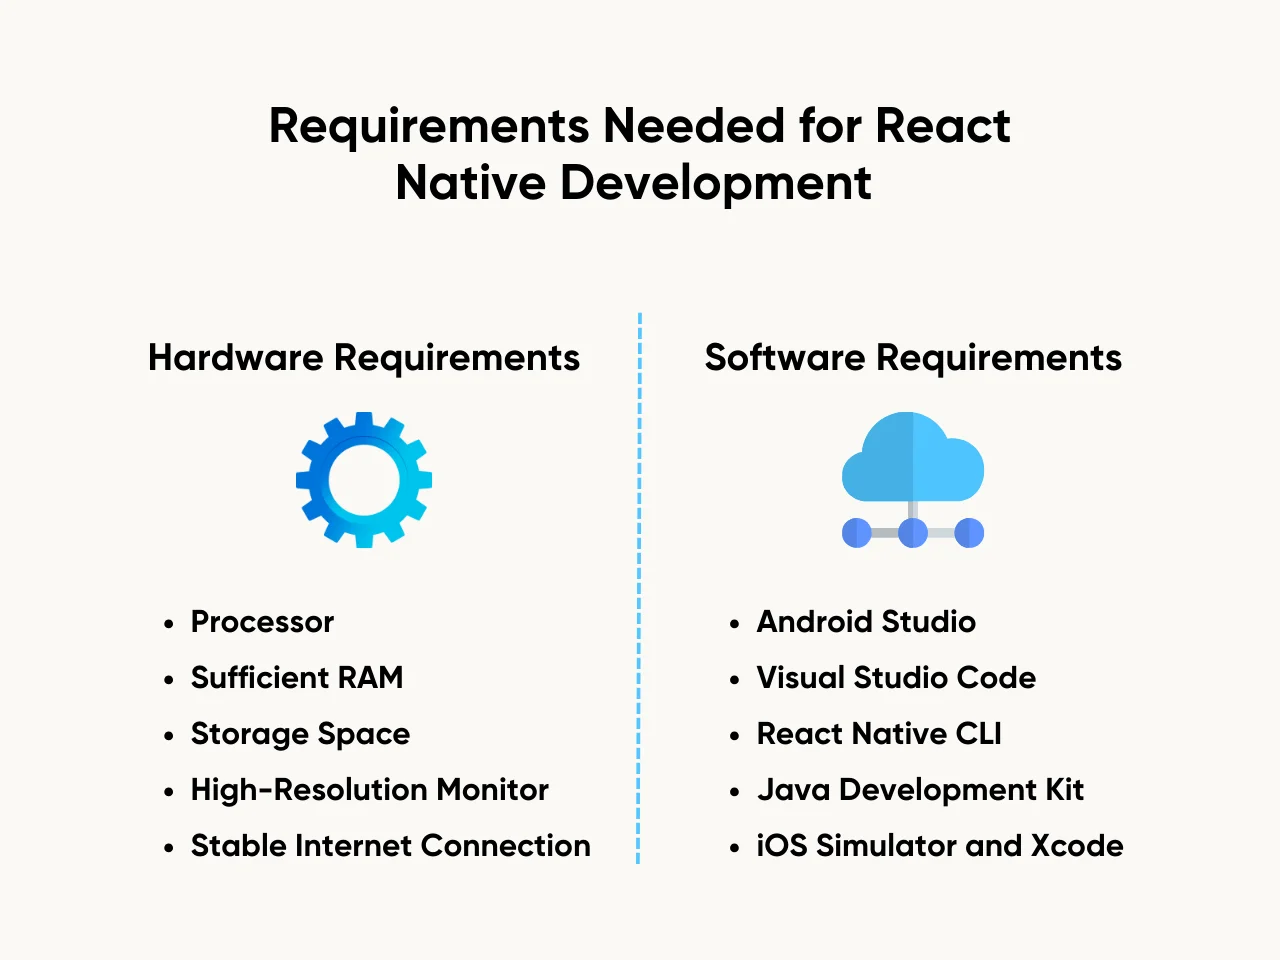
Hardware Requirements
The hardware specifications of your system play a vital role in facilitating smooth React Native development. Here are the essential hardware requirements:
- Processor: A fast processor accelerates build times and enhances the overall development experience. This becomes crucial when compiling native code or running complex applications.
- Sufficient RAM: For running Android Studio or the iOS simulator effectively, a minimum of 8GB RAM is recommended. More RAM allows for multiple emulators and applications to run simultaneously without lag.
- Storage Space: Adequate storage is necessary for the installation of necessary tools, system images, and project files. SSDs are preferred for faster read/write speeds, impacting emulator and application launch times.
- High-Resolution Monitor: A high-resolution display aids in the detailed inspection of UI/UX elements of your React Native application. It also facilitates multitasking with multiple windows.
- Stable Internet Connection: Downloading the latest version of Android SDK, iOS simulator system images, and other necessary tools requires a reliable internet connection.
Software Requirements
In addition to hardware, installing the right software components is imperative for setting up an efficient React Native development environment. Here are the key software requirements:
- Android Studio: Essential for Android development, Android Studio provides robust support for native code debugging, virtual device management through AVD Manager, and access to the latest Android SDKs.
- Visual Studio Code (VS Code): A lightweight yet powerful code editor with React Native tools and Git integration for version control. Its advanced features and comprehensive guide on the official website make it a favorite among React Native developers.
- React Native CLI: The command line interface allows developers to initialize and manage their React Native applications with ease. It's vital for executing commands directly in the terminal or command line.
- Java Development Kit (JDK): For Android development, having the JDK installed is necessary. It allows React Native to compile and execute Java code, which is essential for running the Android emulator.
- iOS Simulator and Xcode: For iOS development, Xcode provides a suite of tools, including an iOS simulator. This allows developers to test their React Native applications on various iOS devices without needing a physical device.
How to Set Up a React Native Development Environment
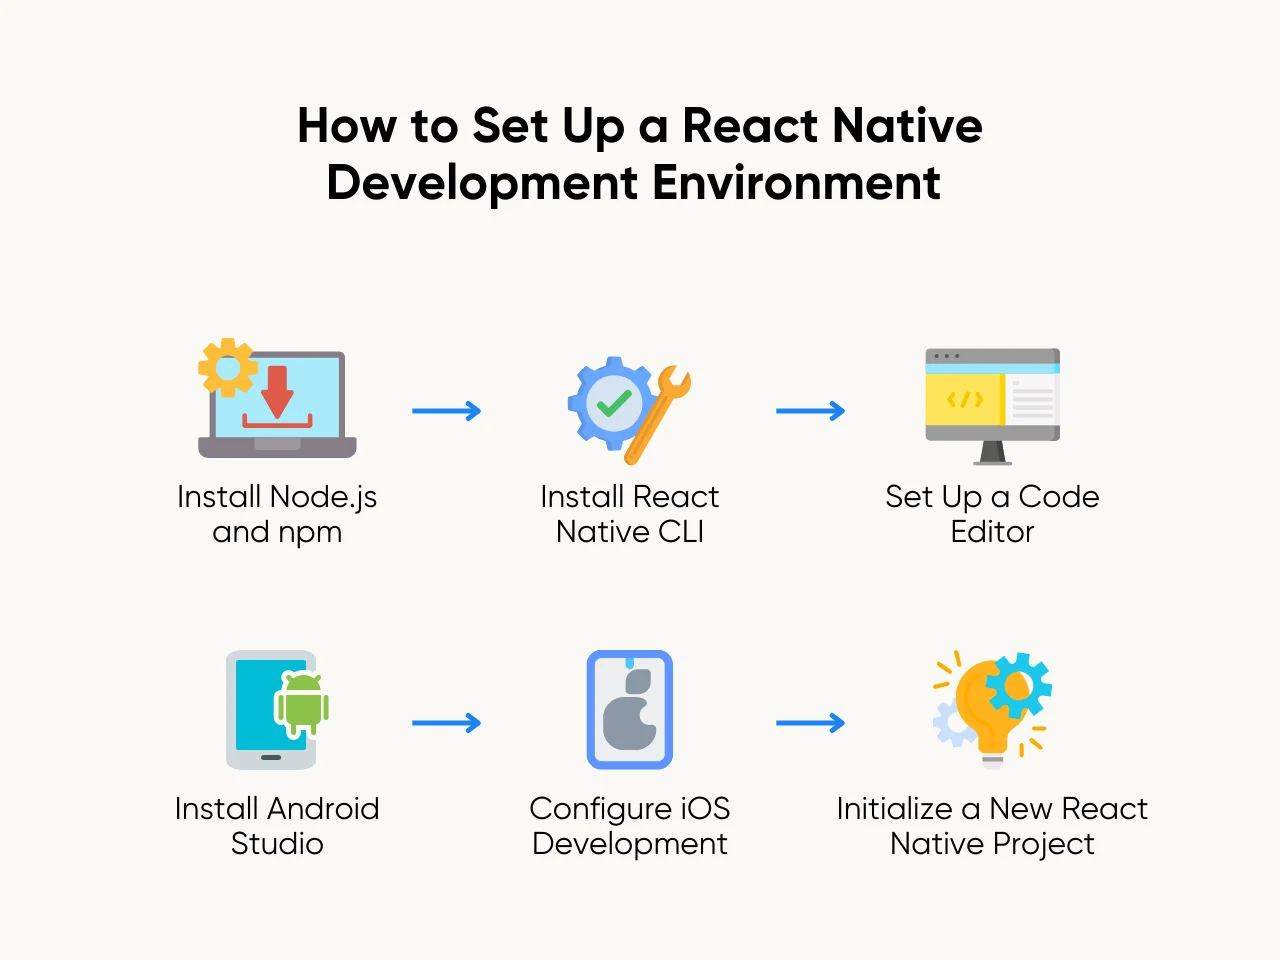
Setting up a React Native development environment is crucial for efficiently developing cross-platform mobile applications. This process involves several crucial stages, from installing necessary tools and frameworks to creating a conducive workspace for developers and configuring the environment for Android and iOS platforms.
Here are the six essential steps to get started:
Step 1: Install Node.js and npm
Setting up a React Native development environment involves installing Node.js and npm, essential tools for JavaScript development. Node.js, serving as the runtime environment, executes JavaScript code seamlessly. Meanwhile, npm streamlines the installation and management of packages and libraries, which are fundamental to React Native development.
To install Node.js and npm, follow these steps:
- Visit the official Node.js website.
- Download the appropriate installer for your operating system.
- Run the installer and follow the on-screen instructions for installation.
- Once Node.js is installed, npm will be automatically installed alongside it.
Upon completion, verify the installation by opening a terminal or command prompt and typing node -v and npm -v. If successful, these commands should display the installed Node.js and npm versions, respectively.
Ensuring the proper installation of Node.js and npm sets a solid foundation for React Native development. With these components in place, developers gain access to a vast ecosystem of libraries and tools, empowering them to build robust and feature-rich mobile applications.
Step 2: Install React Native CLI
One key component in this setup is installing the React Native Command Line Interface (CLI), which streamlines project creation and management. This tool simplifies project management tasks, enabling you to create, initialize, and oversee React Native projects seamlessly.
Here's how to install React Native CLI:
- Utilize npm to install the CLI seamlessly.
- Open your terminal or command prompt.
- Execute the npm install command followed by the name of the package, react-native-cli.
- This command triggers the installation process, fetching the necessary files and dependencies from the npm registry.
- Verify the installation by running the react-native --version in your terminal.
- This command displays the installed version of React Native CLI, confirming its successful installation.
Installing React Native CLI empowers developers to initiate and handle React Native projects efficiently. With this command-line tool, you can swiftly create, initialize, and manage projects, streamlining the development workflow. As you set up your React Native development environment, React Native CLI will be a vital tool in your toolkit, facilitating smooth project management and development.
Step 3: Set Up a Code Editor
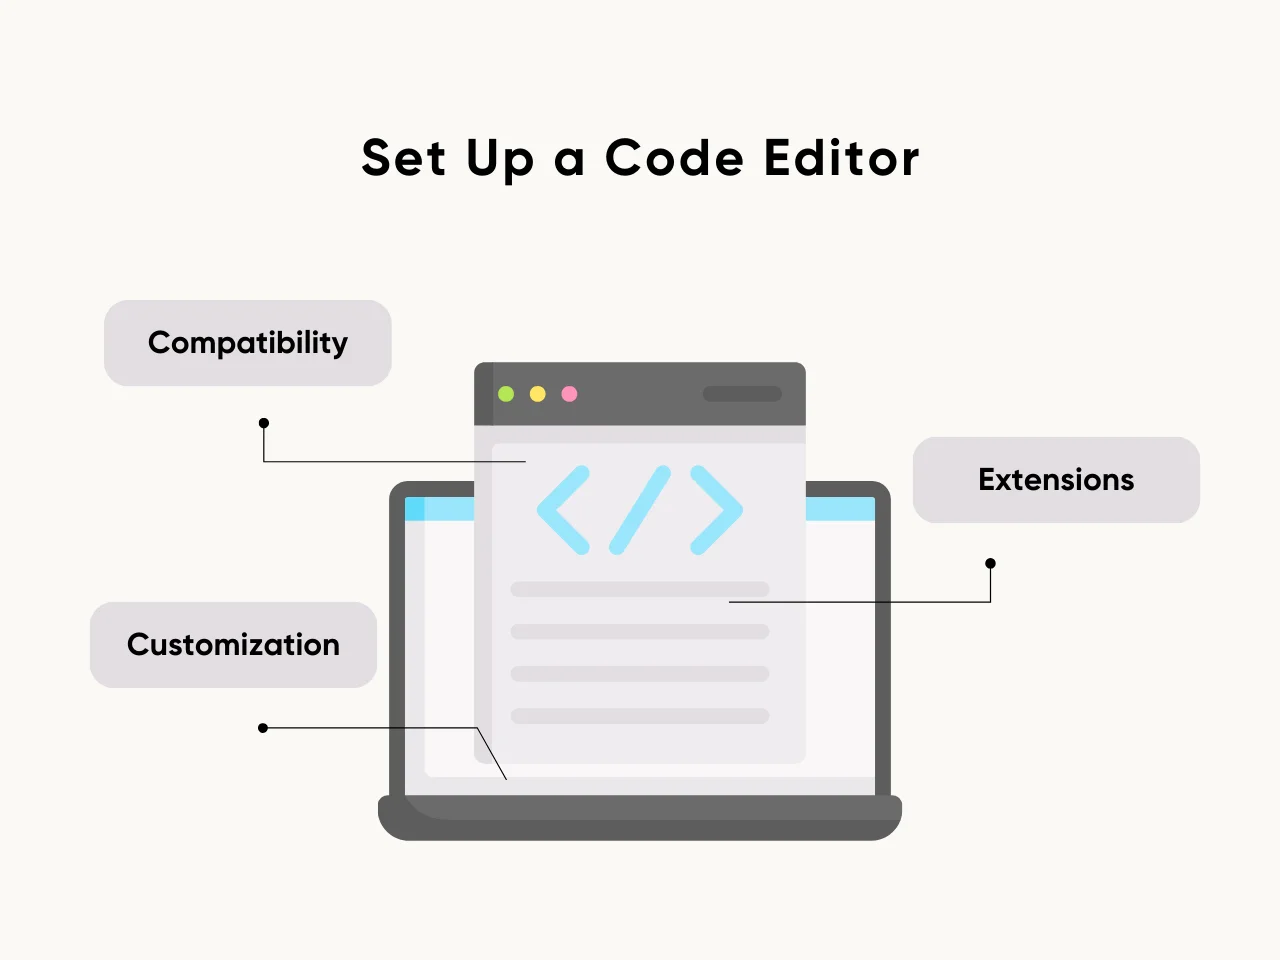
Establishing a conducive environment for React Native development involves selecting an appropriate code editor and configuring it to cater to the specific needs of the framework. Among the many options available are Visual Studio Code (VS Code) and Atom due to their extensive features and flexibility in supporting JavaScript and React Native.
When setting up a code editor, consider the following considerations:
- Compatibility: Ensure the chosen code editor is compatible with your operating system to avoid compatibility issues during development.
- Extensions: Explore and install relevant extensions tailored for React Native development, such as React Native Tools, ESLint, and Prettier, to enhance productivity and streamline coding workflows.
- Customization: Use customization options to personalize your coding environment according to your preferences, including themes, keyboard shortcuts, and syntax highlighting configurations.
Meticulously configuring the code editor and integrating essential extensions, developers can streamline their workflow, boost productivity, and effectively tackle the challenges of React Native development.
Overall, selecting and setting up a suitable code editor is crucial in establishing a productive React Native development environment. With the right tools and configurations, developers can optimize their coding experience and focus on crafting high-quality mobile applications.
Step 4: Install Android Studio

Android Studio is the official Integrated Development Environment (IDE) for Android app development, offering a comprehensive suite of tools and features. To begin, download and install Android Studio from the official website. Once installed, launch Android Studio and follow these steps to configure it for React Native development:
- Open Android Studio: After installation, open Android Studio to initiate the setup process.
- Set Up Virtual Devices: Utilize the Android Virtual Device (AVD) Manager within Android Studio to create virtual devices for testing your React Native applications. Configure these virtual devices with different Android versions and configurations to ensure comprehensive testing.
- Install Necessary SDKs: Android Studio facilitates the installation of Android SDKs and system images required for app development. Ensure you have the latest SDKs and system images installed to support the target Android versions for your React Native projects.
Installing and configuring Android Studio gives you access to a robust development environment tailored specifically for Android app development. Leveraging its features, such as the AVD Manager and SDK management tools, streamlines the process of testing and debugging React Native applications on Android devices and emulators.
Step 5: Configure iOS Development
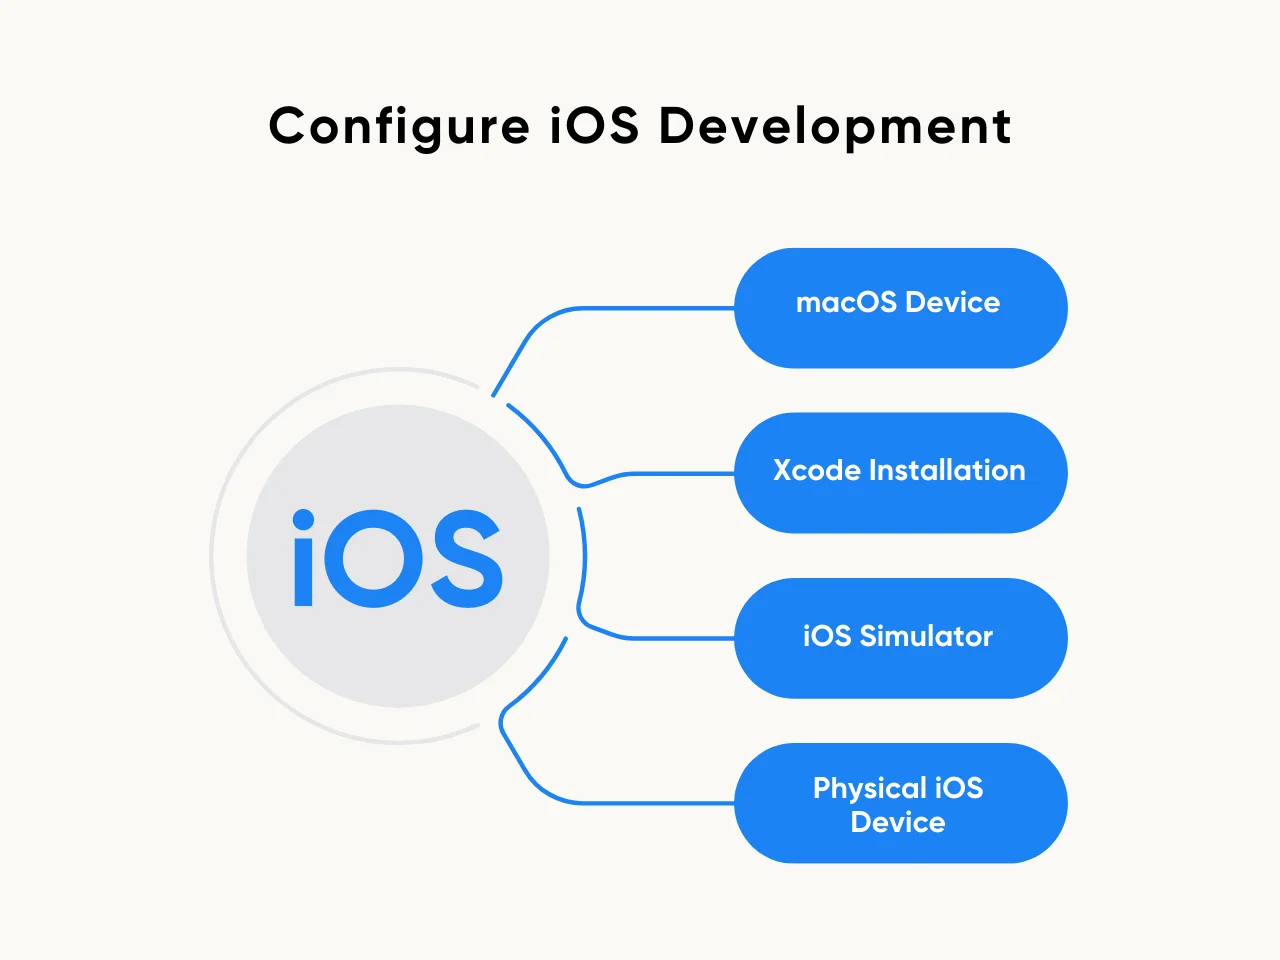
Setting up a React Native development environment involves configuring iOS development for those intending to build iOS apps. Access to a macOS device is essential for this step. Install Xcode, Apple's designated IDE for iOS development, directly from the App Store. Additionally, you'll need to set up an iOS simulator or connect a physical iOS device for comprehensive testing.
Consider the following when configuring iOS Development:
- macOS Device: Ensure you can access a macOS device, as Xcode is exclusively available.
- Xcode Installation: Download and install Xcode from the App Store. Follow the on-screen instructions for a seamless installation process.
- iOS Simulator: Set up an iOS simulator within Xcode to test your applications without needing a physical device. The simulator provides a virtual environment that mimics various iOS devices.
- Physical iOS Device: Alternatively, you can connect a physical iOS device to your macOS machine for testing. Ensure the device is appropriately configured and recognized by Xcode.
Following these considerations and configuring iOS development, developers can extend their React Native projects to iOS platforms, ensuring comprehensive compatibility and testing. This step is crucial for reaching a wider audience and delivering a seamless user experience across iOS and Android devices.
Step 6: Initialize a New React Native Project
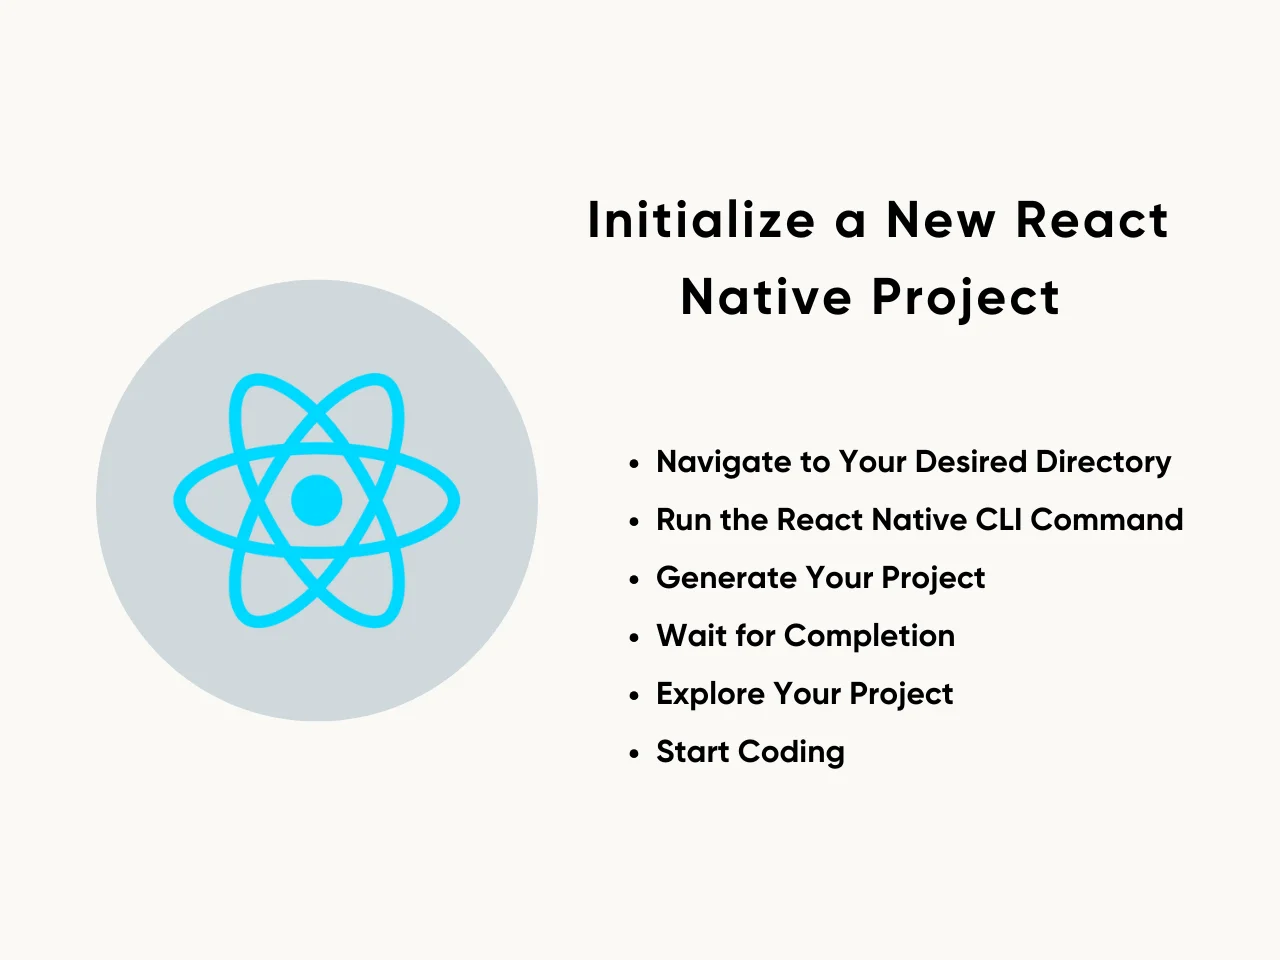
The final step in setting up your React Native development environment involves initializing a new React. Using the React Native CLI to create a new project is fundamental in setting up your development environment. Follow these simple steps to get started:
- Navigate to Your Desired Directory: Open your terminal and navigate to the directory where you want to create your new React Native project.
- Run the React Native CLI Command: In the desired directory, run the command npx react-native init MyProject in your terminal. Replace "MyProject" with the name you want for your project.
- Generate Your Project: After running the command, the React Native CLI will initialize a new project according to your name. It will generate all the files and folders required for your React Native application to function.
- Wait for Completion: Depending on your system's speed and internet connection, the process might take a few minutes. Be patient and let the CLI finish generating your project.
- Explore Your Project: Once the process is complete, navigate into your newly created project directory. You'll find all the files and folders necessary to start building your React Native application.
- Start Coding: With your project initialized, open your preferred code editor and start coding your React Native app. You're now ready to bring your app idea to life!
With the necessary files, you can focus on implementing features, testing functionality, and delivering a seamless user experience across iOS and Android platforms. Following these steps, you've successfully set up your React Native development environment and initialized a new project. Now, it's time to build your cross-platform mobile applications.
Best Practices to Follow for React Native Development
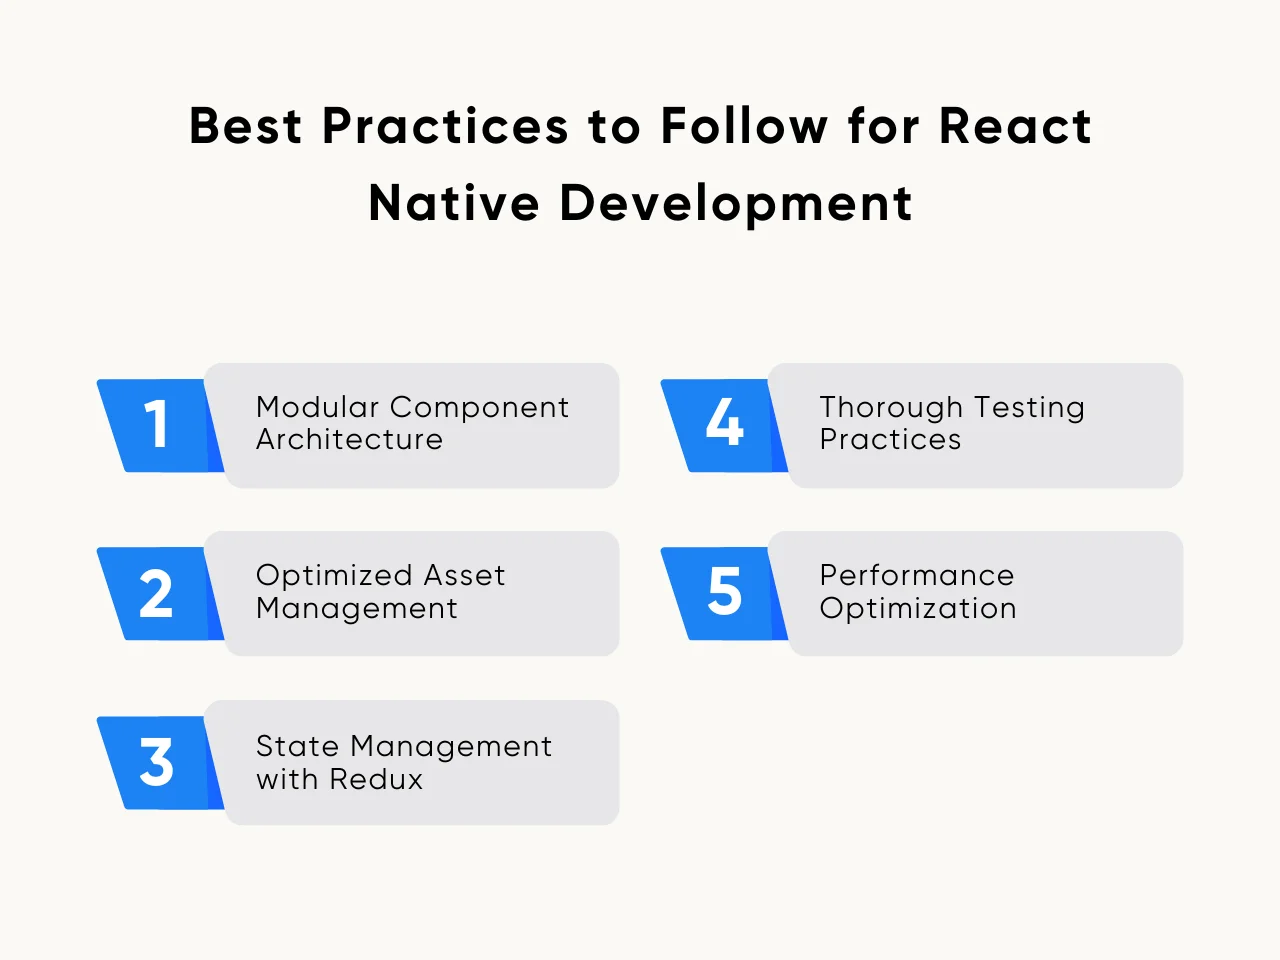
Developing applications with React Native requires adherence to certain best practices to ensure the project's efficiency, maintainability, and scalability. Here are five essential practices to incorporate into your React native development environment:
Modular Component Architecture
Embrace a modular component-based architecture to enhance code reusability and maintainability. Break down complex UIs into smaller, reusable components that encapsulate specific functionalities. This approach promotes cleaner code, facilitates easier debugging, and simplifies future modifications.
Optimized Asset Management
Efficiently manage assets such as images, fonts, and other resources to minimize app size and optimize performance. Utilize tools like React Native Asset Management to handle asset bundling, compression, and lazy loading. By optimizing asset management, you can reduce app loading times and enhance user experience.
State Management with Redux
Implement a robust state management solution like Redux to manage the application state effectively. Centralizing state management ensures consistency across components and simplifies data flow within the application. By maintaining a single source of truth, Redux enhances predictability and scalability, making it easier to manage complex data interactions.
Thorough Testing Practices
Prioritize comprehensive testing throughout development to identify and address potential issues early. Adopt a combination of unit, integration, and end-to-end tests using frameworks like Jest and React Native Testing Library. Automated testing helps maintain code quality, reduces the likelihood of regressions, and boosts confidence in the application's stability.
Performance Optimization Techniques
Implement performance optimization techniques to deliver a responsive and smooth user experience. Code splitting, memoization, and virtualization can minimize rendering bottlenecks and improve app responsiveness. Additionally, leverage tools like React Native Performance Monitor to identify performance hotspots and optimize critical paths for enhanced efficiency.
Benefits of Using a React Native Development Environment
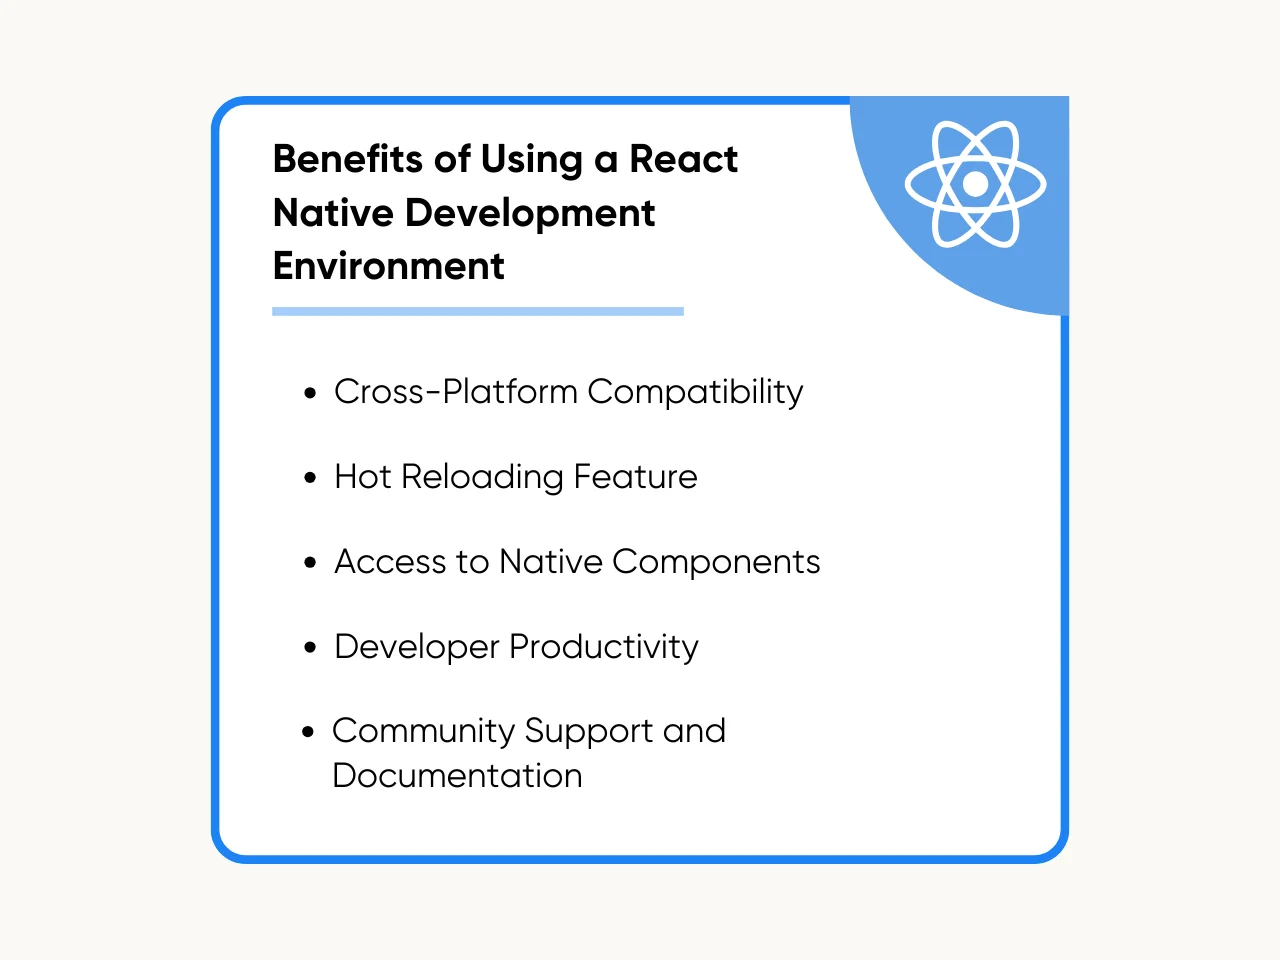
Utilizing a well-configured React Native development environment offers numerous advantages to developers, enabling them to streamline the app development process and deliver high-quality cross-platform applications efficiently. Here are five key benefits:
Cross-Platform Compatibility
Developers can write a single codebase that runs smoothly on Android and iOS. This capability not only saves significant time but also reduces development costs. With React Native development, businesses can reach a wider audience without investing in separate development teams for different platforms.
Hot Reloading Feature
The hot reloading feature is a game-changer in the React Native development. It allows developers to see the results of their latest code changes in real time without losing the current state of the application. This immediate feedback loop enhances developer productivity and speeds up the development process, making React Native an attractive option for rapid application development.
Access to Native Components
React Native provides access to native components, enabling developers to utilize the full potential of the device's hardware. This access ensures that apps built with React Native perform as well as those developed in a native development environment. Whether it's utilizing the camera, GPS, or accelerometer, React Native makes it straightforward to integrate with native device functionality.
Developer Productivity
The React Native development environment is designed to maximize developer productivity. With features like hot reloading and a wide range of pre-built components, developers can focus on creating unique app features rather than worrying about boilerplate code. Additionally, using JavaScript – a language familiar to many web developers – lowers the learning curve and allows teams to leverage existing skills.
Community Support and Documentation
The vibrant community around React Native is a testament to its popularity and effectiveness. A vast array of tutorials, forums, and documentation is available to help solve any challenges that may arise. This community support, combined with comprehensive documentation from Facebook, ensures that developers have all the resources they need to succeed with React Native.
Key Takeaway
The right React Native development environment is essential for efficient app development. This environment allows developers to create and test applications across different platforms seamlessly. With a well-configured React Native coding environment, teams can streamline their workflows, ensuring that they can focus on innovation rather than troubleshooting setup issues.
Implementing a React Native environment configuration speeds up the development cycle and significantly reduces the overall project costs. Developers leverage the same codebase for iOS and Android platforms, simplifying updates and maintenance. More than that, it supports hot reloading that leads to immediate visibility of changes, increasing productivity and encouraging a more iterative approach to app development.
Looking for more insights into development? Our resources offer information and best practices to enhance your development strategies. Whether you're new to React Native or looking to refine your current React Native development environment, Aloa provides the resources and expertise to elevate your project. Explore our development blogs for more invaluable tips and guidance.


